Welcome!

Thanks for stopping by Recipes From The Heart Of Your Home. Don't forget to check out the Christian resources we have linked to on the left of the page. I am a Christian wife and mother, doing my best to take care of my family and be a good steward of the wonderful blessings God has given us. I enjoy cooking for my family and doing it unto God for His glory. I love to cook from scratch when it's affordable and not too time-consuming and I especially love to bake. Lots of family and friends ask for my recipes so I've decided to put them on a blog so they can get them or anyone else who wants them. I think you can make good quality, good tasting food at a fraction of the ready-made price and it doesn't have to break your budget. Please let me know how these recipes turn out. They're our family's favorites. I'll be updating this blog as often as I can. Enjoy and God bless!

Melissa

If you like my blog, subscribe on the left side of the page so you get automatic updates via email. Please check out our other website: A-typical Christianity is a blog by my husband and I on the Christian faith, current events, apologetics, and more at http://atypicalchristianity.blogspot.com/ .
Showing posts with label Economical Recipes. Show all posts

Thursday, June 14, 2012

Homemade Sweetened Vanilla Yogurt - Thick, creamy, and way better than store-bought and cheap too!

I searched high and low on the internet for a homemade sweetened vanilla yogurt recipe to no avail.  So, I had to make up my own through trial and error.  This yogurt is so delicious, super-thick and healthy for you.  No need to waste your money on those ridiculously expensive Greek yogurt containers to get thick yogurt.  Best of all, it's really easy to make homemade yogurt.  No special equipment or ingredients needed.  No yogurt makers, coolers, starters, or anything.  Those are gimmicks anyways for people to make money off of you and totally not necessary.  Don't buy into it.


Homemade Vanilla Yogurt
Ingredients:
1 gallon whole milk
1 1/2 cups sugar
6 tbs. vanilla extract
1 cup plain yogurt
1/2 cup cold milk
3 envelopes unflavored gelatin (optional)
The recipe may seem complicated by all the directions, but  I just like to leave all my notes and tips in there so there's no confusion on how to make it.  But, if you have any questions, just ask. 

This recipe is for a gallon of yogurt, which is what we make (we have 5 in our family) and it lasts for a few weeks or maybe longer without spoiling.  We just usually have it all eaten up by then.  You could half this if necessary.

Directions:
1) I take one gallon of milk and put it in a large pot on the stove on medium heat.  I warm it up to 180 degrees.  I use a meat thermometer, or you could use a candy thermometer just fine.  It takes somewhere around a half hour on our stove.  I've accidentally forgotten about it on the stove before and it's gotten up to 220 and still had it work, although the pot was about to boil over at that point.  I don't stir my pot either, but just let it sit.  This makes it really easy.  It will get a skin on top like cooked pudding will, but I just take a whisk and scrape it off and dump it in the trash once it's cooled down.  It's much easier than having to stir the pot non-stop and I've never had my milk scorch or burn this way despite not stirring it.  If you don't heat it at least up to 180, it won't set right.  So, once your milk is up to 180, take it off the burner and let it cool to 110 degrees.  It takes much longer to cool than to warm up, about an hour.

2) I take the skin off like I said, and then mix 1 1/2 cups of sugar into the pot with a whisk until dissolved.  We used to use 2 cups of sugar, but since we like to add a fruit sauce and granola on top of our yogurt, it can be a bit too sweet.  1 cup of sugar was too sour for us, but do it to your tastes.  I also add 6 tbs. of vanilla extract and whisk that in. 

3) In a small bowl, I take about 1/2 cup of cold milk and take 3 envelopes of unflavored Knox gelatin.  I've used 2 envelopes and it didn't thicken it up.  When I used 4 envelopes, it was like eating yogurt Jello.  Not the right consistency.  3 is just right.  You can omit this step entirely if you don't want to use gelatin.  It still makes a delicious and very thick yogurt, but when you use the gelatin, it stays really thick and we just love it this way.  Sprinkle your gelatin on top of the cold milk in the bowl and let it sit for about 2 minutes, then stir.  It will be the consistency of baby rice cereal or a soupy oatmeal.  Then, whisk it in quickly into your sweetened warm milk.  Make sure you get out any lumps.  If you add the gelatin straight to the warm milk, it will set up the gelatin and it won't mix in.  If you let the gelatin sit in the cold milk too long, it will get too thick to mix in the milk and won't dissolve easily.  The trick is to just wait a few minutes until soupy, then stir it in quickly.
 This is what it looks like after a few minutes.
  This is the soupy consistency once it's stirred.

4) Then, add 1 cup of unsweetened plain yogurt.  I like to use Dannon plain yogurt in a 32 oz. container.  That container has about 4 cups of yogurt and will last my family about a month and still be fresh and make 4 gallons of yogurt.  Some people say you can use your homemade yogurt as a starter, but I've never done that.  Since my yogurt is sweetened and thickened, and not plain, I don't know if it would work anyways.  Also, I've heard that the more you use your homemade yogurt as a starter, the more sour each batch gets.  I just simply buy the store-bought plain yogurt instead.  Whisk the plain yogurt into your pot very slowly. If you whisk it too fast, you'll mess up the cultures and it won't set right.  Just whisk slowly until most of the yogurt is mixed in well.
Then, pour your milk mixture into a container.  I use 2 glass Pyrex 2.75 qt. containers with lids.  This holds exactly 2 gallons for me.  
I take two thick bath towels and lay them on my counter and stack my containers inside.  I wrap the towels around the containers to keep them insulated.  


5) I let it sit for 14 hours.  I've done anywhere between 8 and 20 hours before, but 14 seems to work pretty good for me.  Depending on the temperature inside your house and the time of year, it may affect how long you want it to set out.  Then, after 14 hours, set your yogurt in the fridge.  Don't stir it or mess with it, but let it sit in the fridge for about a day to set up and get cold.  Then, enjoy!  Once you dig into the yogurt, after a while, some whey will separate out.  You can simply use it in a recipe or smoothie, or drain it off.  If I don't use the gelatin, when the whey separates from the yogurt over time, the yogurt tends to get soupier and soupier and mixes in with the whey.  I would then use it in smoothies or something.  But, when I use the gelatin, the yogurt stays thick and doesn't mix in with the whey.  It stays thick to the end and we love how thick and yummy this yogurt is.
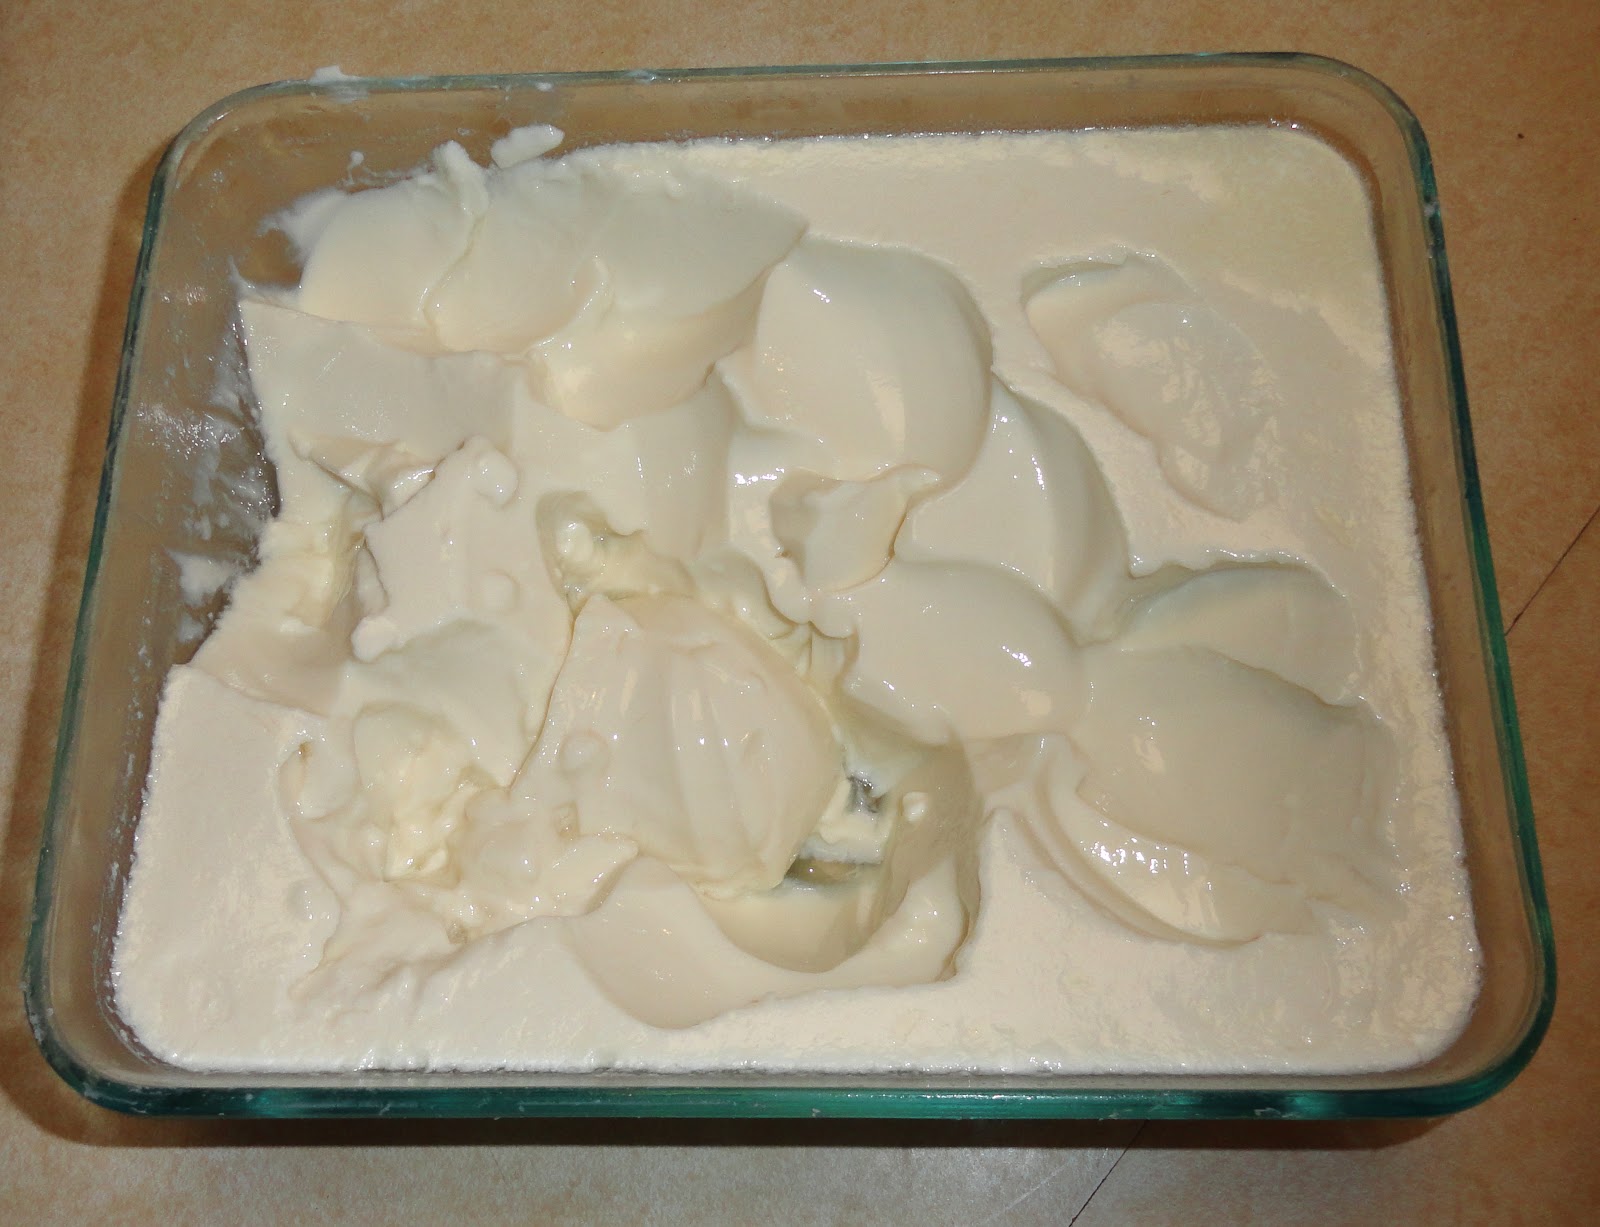
 This is how thick the yogurt still looks after being dug into several times.  It holds it's shape well.

This is great served with a homemade fruit sauce.  (I make this all the time by making a jam recipe and just not using pectin.)  Top with fresh fruit and Skillet Granola and you have a delicious breakfast! 

Your Savings:
This is way cheaper than buying store-bought yogurt and it tastes way better and fresher and has only a few ingredients.  You can make many types of flavored yogurts by simply changing the type of sauce you top it with.  To make 4 gallons of homemade yogurt, it would cost whatever 4 gallons of milk costs (or free, if you have your own cow).  Lets say around $14, plus a container of store-bought plain yogurt, approximately $3, plus the minimal cost of sugar and vanilla and a little more if you use the gelatin packets.  Lets say around $19 to make 4 gallons of yogurt.  If you bought 4 gallons of store-bought vanilla yogurt, that could run you around $48 if 32 oz. yogurt cost you around $3.  That's a savings of almost $30, more or less depending on the cost of your ingredients.  Much cheaper if you have a dairy cow.  This is a cheap and healthy way to make a delicious breakfast for your family.  Throw yogurt in smoothies or make homemade yogurt popsicles.  So good!

Tuesday, August 10, 2010

Refreshing Summer Lemonade


This is a very simple and quick lemonade to make that is refreshingly delicious, especially in the hot summer months. There's rarely been a lemonade I liked, but I love this one. It's sweet and slightly sour. I don't like overly sour lemonades at all. Below, you can also find a strawberry lemonade variation. Hope you enjoy!

2 cups lemon juice (can use fresh, but I just use the bottled kind on the shelf)
3 1/2 cups sugar (can use less if too sweet for your tastes)
1 gallon of water

1) Fill a 2 cup microwaveable pyrex cup with water up to 2 cups. Microwave for 2 minutes. Pour into a gallon size Rubbermaid pitcher or cleaned milk gallon container.

2) Add sugar, put on lid and shake to dissolve sugar, or if in an open-topped pitcher, stir with spoon until dissolved.

3) Add 2 cups of lemon juice and fill to the top of gallon container with water. Shake or stir to mix. Add fresh lemon slices or mint if desired. (I don't bother.) Best, if chilled for a bit before serving, or add to a cup of ice. Enjoy!

For a DELICIOUS Strawberry Lemonade version:

Don't fill all the water to the top of pitcher, otherwise you'll run out of room. Fill a blender about half full of lemonade and add frozen strawberries, perhaps 2 cups or whatever you desire. I like a lot of strawberries! Blend until smoothie-like consistency. Pour back into lemonade container, stir or shake to mix and enjoy a delicious, pink, strawberry lemonade that's sure to be a favorite.

Wednesday, April 7, 2010

Easy and Versatile Potato Salad

I used to think potato salad was hard to make and required a recipe, but now I know it's very easy and you can make it however you want and can easily make it for a crowd without having to double or triple a small recipe. My mother-in-law makes a really good potato salad (My husband's favorite, until mine.) and I liked it, but wanted more mayo and seasonings. Once she showed me how to do it, I realized just how easy potato salad is to make and now I no longer follow a recipe. Who needs to! So, this is how I make it. Sorry, it's not specific, but this is the general guidelines and you can find what works for you and make your own signature potato salad. Everyone likes it a little different. (I'll post a picture when I make it next.)

Potato Salad

Potatoes (as many as you like) Once cooked, let sit in fridge until completely cold and then if desired, peel skins off potatoes (This is what I do). I can typically do this with my hands because they come off pretty easy. Chop to desired size.

Eggs (as many as you like - we like a lot!) Put in fridge. When cold, chop eggs up.

Mayonnaise (as much as you need) Some people like a really dry potato salad and others like a lot of mayo. I'm more on the mayo side, but don't overdo it!

Seasonings (whatever you like best and as much as you like) I personally love a lot of the House Seasoning in it. Gives it great flavor. Most potato salads I try, in my opinion don't have enough salt and therefore don't have enough flavor. I also add some dill sometimes, perhaps extra garlic powder or onion powder, and sometimes I like to add dried onion flakes because it gives you the yummy onion taste without being as strong as fresh chopped onions. Make sure if you use the dried onions, you let your potato salad sit a while so the onions get softer. My typical recipe just uses House Seasoning to taste though.

If desired, you can add chopped celery, or chopped bacon, or whatever you like in your potato salad. I just do mine with eggs, potatoes, mayo, and seasonings and love it best that way!

Mix all ingredients in a bowl (do eggs last, otherwise they'll turn to a paste- been there, done that) Once you've got desired taste and consistency, add eggs. Season more or add more mayo if necessary. Sit in fridge for several hours to get cold and have flavors mix. Enjoy!

Cooking Directions:

Potatoes - Microwave without poking holes in them for 9 minutes or until potatoes are tender all the way through when pierced with a fork. The easiest and tastiest way to microwave potatoes is to get them wet and wrap completely in a slightly damp kitchen towel. This steams the potatoes and they don't dry out like they do when you poke holes in them with a fork. (This makes a great baked potato for dinner!) You can also boil them in the skins until they are done.)

Eggs - The easiest and most fool-proof way I've found to hard boil eggs is to get a large enough pot to put your eggs in a single layer on the bottom. Then, fill it with COLD water and cover eggs with 1 inch of water above them. Put on burner on high and wait until a full rolling boil. (This is where I always went wrong because as soon as it would start to boil, I would take it off the burner. You must wait until it's a boil that is very hard and bubbling and not stopping.) Then, as soon as it's a full rolling boil, take off burner and cover with lid. After 18 minutes, pour out hot water and run cool water over eggs. This will make a dry, but not too dry yolk, like you would get at a restaurant on a salad. It might take a few times to get it just right, so don't give up. I make egg salad sandwiches all the time with this. It's also a great way to use up eggs that didn't get cooked enough in the middle. No one will ever know!

Monday, August 11, 2008

Black Bean Burgers


These burgers are way better than they sound. I made a double batch of these last time and they didn't last that long. We stored them in the freezer for a quick meal. I top it just like a cheeseburger with ketchup, mustard, mayonnaise, cheese, and lettuce and tomato. These are cheap and delicious and good for you too!

Black Bean Burgers

Preparation Time: 10 minutes
Chilling time: 1 hour
Cooking Time: 10 minutes

2 cans (15 ounces each) Black Beans, rinsed and drained
½ cup all-purpose flour
¼ cup yellow cornmeal
½ cup chunky salsa
2 teaspoons ground cumin
1 teaspoon garlic salt
Hamburger buns

Place beans in food processor; process until fairly smooth. Add flour, cornmeal, salsa, cumin and garlic salt. Process until well combined. Spoon mixture into 6 balls on a large plate and refrigerate at least 1 hour or up to 4 hours before cooking.

Heat barbecue grill or ridged grill pan over medium heat. Coat grill or pan lightly with oil. Form each ball into a 4-inch patty about ½-inch thick. Place the patties on the grill or in pan and cook until browned and heated through, 4 to 5 minutes per side. (I just cooked these in a frying pan with olive oil and it worked just fine.)

Serve on hamburger buns with your favorite toppings.

Are you a good person?

http://atypicalchristianity.blogspot.com
http://titus2wifeandmommy.blogspot.com

Monday, August 4, 2008

Super Easy and Quick Drop Biscuits


These biscuits are so yummy and so quick to make. I never used to make biscuits because I could never seem to get them right with rolling and cutting them out and they were always dry and took forever to make. So, I would wait for Pillsbury biscuits to go on sale, but I still was spending about $1.67 for 8 biscuits. I don't know how much these cost to make, but they have got to be a fraction of the cost and you get 12 biscuits instead. I make a double batch of these and keep them stored in the freezer to serve with dinner at a moment's notice.

Drop Biscuits

2 cups flour
1 tbs. baking powder
1/2 tsp. salt
1/3 cup shortening
1 cup milk

1) In mixing bowl thoroughly stir together the flour, baking powder, and salt. Mix well to evenly distribute the leavening (baking powder) and salt.

2) Cut shortening into flour mixture till mixture resembles course crumbs. Be sure to use solid shortening instead of cooking oil or melted butter. Don't mix by hand, but use a pastry blender or forks and knives.

3) After cutting in the shortening, the mixture should resemble coarse crumbs. Avoid blending the fat completely with the flour or using a liquid shortening. These produce mealy biscuits rather than the flaky, tender ones which are more desirable.

4) Gently push the flour-shortening mixture against the edges of the bowl, making a well in the center. Add the milk all at once, pouring it into the well.

5) Using a fork, stir the mixture quickly. Stir just till the dough follows the fork around the bowl and forms a soft dough. Too much mixing may result in biscuits that are tough and not as light as desired.

6) Using a knife or a narrow spatula, push the dough from a tablespoon onto greased baking sheets to make 12 biscuits.


7) Bake biscuits in 450 deg. F. oven for 10 to 12 minutes or until biscuits are golden. Serve immediately.

Makes 12 biscuits.


This is my favorite way to have these biscuits. Butter and jam!


This is my hubby's favorite way. He likes to have biscuits with sausage gravy.

To make these extra yummy, melt 1/2 stick butter, and using a pastry brush, brush on biscuits immediately after they get out of the oven. Mmmmmm!

Check out my Garlic Cheese Drop Biscuit variation by clicking here. These taste just like the yummy biscuits they give you while you're waiting for your food at Red Lobster. These take hardly any more time to make and they are really good!

Are you a good person?

http://atypicalchristianity.blogspot.com
http://titus2wifeandmommy.blogspot.com

Friday, August 1, 2008

Lentil and Spinach Puffs


These are a very yummy and healthy treat. You could serve them as an appetizer with a dipping sauce for a party or have as a side dish with your meal. They're a great finger food and cheap to make. I like to double this recipe.

Lentil and Spinach Puffs

3/4 cup dried lentils
3 tbs. water
2 tbs. chopped onion

16 oz. frozen spinach thawed, and squeezed dry
3/4 tsp. salt
1 garlic clove, minced
2 tsp. flour
1/8 tsp. baking powder

peanut or vegetable oil

1) Sort and wash lentils; place in a bowl. Cover with water to 2 inches above lentils. Cover and refrigerate 8 hours or overnight.

2) Drain lentils well. Place lentils, water, and onions in a food processor; process until smooth, scraping down sides occasionally. Combine the pureed lentil mixture and remaining ingredients (excluding oil) and mix well.

3) Heat oil (as much as needed to coat bottom of pan) in a large nonstick skillet over medium heat. Drop lentil mixture by heaping tablespoons into pan. Flatten slightly with bottom of spatula. Cook 2 minutes on each side or until browned and heated through. Remove from pan. Cover and keep warm. Repeat procedure with remaining lentil mixture.


Here's my 2 1/2 year old son Camden helping me stir the mixture. He loves to cook!


This is them cooking in the pan. Make sure you add more oil as necessary and adjust the temperature if needed so they don't burn.


I just had this for my main course for dinner tonight. I liked them that much! I drizzled(or rather slathered them) with my Homemade Russian Dressing and sprinkled them with Lawry's Garlic Salt. Yumm-o!

Are you a good person?

http://atypicalchristianity.blogspot.com
http://titus2wifeandmommy.blogspot.com

Thursday, July 24, 2008

Baked Oatmeal


This is a picture of the version with the dried cranberries, coconut, raisins, and almonds added.

This recipe makes such a yummy, wholesome breakfast. After eating this, I can never eat the mushy instant oatmeal again. I love to top this with syrup and to make it healthier and heartier, I will mix in dried fruits and nuts. My husband likes to top this with milk. Either way you go, it's delicious and very economical! I like to double this recipe and stock it in the freezer in individual serving-size containers. Just pop in the microwave and you've got a fast breakfast. I actually like to eat mine cold from the fridge.

Baked Oatmeal

3 cups quick oatmeal
1 cup sugar
1 cup milk
2 eggs, beaten
1/2 cup vegetable oil
1 tsp. salt
2 tsp. baking powder
1 tsp. vanilla extract
1/2 tsp. ground cinnamon
(Mix first.)

To make it healthier, I like to also add:
1/4 cup raisins
1/4 cup dried cranberries
1/4 cup coconut
1/4 cup sliced almonds

Mix all ingredients together and put in a greased 8 X 8 square pan. Bake at 350 deg. F. for 30 minutes. Let cool, and cut into squares (mine fall apart, but still taste good) and serve with syrup if desired.

To double recipe, cook in 13 X 9 pan and bake for approx. 40 minutes.

Are you a good person?

http://atypicalchristianity.blogspot.com
http://titus2wifeandmommy.blogspot.com

Thursday, July 17, 2008

Lentil Oat Loaf

This recipe is one I made by combining elements of a few different recipes together. I wanted something that was economical and yet tasty to make. Most lentil loaves have a lot of expensive ingredients in them or they're really lacking in the flavor department and dry as well. It's not a substitute for a meatloaf, but it is a nice healthy, cheap meal that you can easily double. I'll add a picture after I make it next.

Lentil Oat Loaf

SERVES 6 , 1 loaf

Ingredients

1 ½ cups dried lentils
3 ½ cups of water
1 medium onion, diced
1 cup rolled oat (quick or large flake)
3/4 cup grated cheddar cheese
1 egg, beaten
2/3 cup BBQ sauce (I like Sweet Baby Ray’s Vidalia Onion BBQ sauce best.)
1 teaspoon garlic powder
1 teaspoon dried Italian seasoning
2 teaspoon seasoning salt (Could use less if you find it too salty….I like salt.)
1/4 teaspoon black pepper

Directions

1) Cook lentils in water until tender. Slightly mash.
2) Mix lentils, onion, oats, and cheese in a large bowl and mix well.
3) Add the beaten egg and mix well.
4) Add sauce, garlic, Italian seasonings, salt, and pepper.
5) Spray a loaf pan with cooking spray and pour/scrape the lentil mixture into it. Even out the top surface with a spatula or fork and top with more barbecue sauce.
6) Bake uncovered 30-40 minutes at 375 deg. F.

Are you a good person?

http://atypicalchristianity.blogspot.com
http://titus2wifeandmommy.blogspot.com

Monday, July 14, 2008

Sticky or Crunchy Caramel Corn


This is one of my favorite recipes. I try not to make it very often only because I have a hard time controlling myself. It is so addictive I want to eat the whole thing in one sitting! I usually put the leftovers in a ziploc bag in the freezer to make it last longer, but I find myself snacking on it from the freezer as well and it usually only lasts tops a few days in our house. It's that good! Save yourself some money and don't buy that Crunch N' Munch stuff. Make it yourself. It makes a lot for a fraction of the price and you can't beat the taste. My favorite version is the sticky caramel corn. It's messy, but it's so yummy and chewy!

Sticky Caramel Corn

1 stick butter (yes, a whole stick!)
3/4 cup corn syrup
1 cup packed light brown sugar
1 tsp. vanilla extract
1 gallon freshly popped and salted popcorn (To save time I usally pop 2 regular-size bags of microwave popcorn and it seems to be enough for the recipe.)
chopped nuts if desired (I like to add pecans or peanuts to make it like the boxed stuff, only better)

Put popcorn in extra large bowl. Remove unpopped kernels. Melt butter in sauce pan on med-high heat. Add brown sugar and corn syrup. Heat to a bubbly boil. Remove from heat. Add vanilla. Stir. Add nuts or other add-ins if desired. Pour mixture over popcorn and stir until well coated. Serve.

Crunchy Caramel Corn

Make as directed above. Preheat oven to 275 deg. F. Place popcorn mixture on greased baking sheets. Stir every 15 minutes for an hour. May take longer to bake if you want it more crisp and crunchy. This will be like the Crunch N' Munch boxed stuff, but better.

Popcorn Balls

Make as directed above, but when cooled slightly, butter hands if necessary and form into balls. You could add food coloring and flavorings before mixing it with the popcorn to have around the holidays. You could have red or pink popcorn balls for Valentine's Day or Christmas, etc. I've also seen people add candy corn to popcorn balls around Thanksgiving/Halloween, but I haven't personally made it that way yet. You could also add M&M's, but wait until it's cooled a little so you don't melt it all. If you're using brown sugar, I'm not sure how well the colors will show up. You might want to use white sugar instead, but like I said I haven't tried it yet, but then it wouldn't technically be caramel corn anymore. Let me know if it works out.


Here is a picture of a strawberry flavored popcorn ball.

Are you a good person?

http://atypicalchristianity.blogspot.com
http://titus2wifeandmommy.blogspot.com

Friday, July 11, 2008

Popsicles - Cheap summer treat


As a kid our family didn't always have a lot of money and my mom used to make some really good cheap food. One of my favorite things was Kool-Aid popsicles. They were always so good and refreshing when we lived in Florida because it always got so hot. What's better than a cold popsicle on a hot summer's day? I just recently began making them for my kids and us and they are definitely better than those expensive brands at the store and you can make an endless variety of flavors. It cost me 20 cents or less I think to make maybe 18 popsicles I think. Of course it depends on the size of your popsicle mold and the brand of soft drink mix you buy. Here's the recipe. Hope you like it!

Kool-Aid Popsicles

1 unsweetened Koolaid or other brand soft drink packet (.14 oz.)
1 cup of sugar
1 quart of water, or more if it's too sweet for you

Mix all ingredients well in a pourable pitcher. Pour into molds, insert popsicle sticks, and freeze thoroughly. Run mold under warm water and twist and pull until popsicle comes out of mold. Enjoy! To save time, unmold all your popsicles at once and keep in large ziploc freezer bag so they're ready to go.

Try mixing and matching flavors and see what kind of popsicles your kids like best.

Pudding Popsicles

You can also make cheap, delicious pudding pops that are better than store-bought and very cheap to make. Just make up a box of instant pudding and pour into the popsicle molds and freeze. You can also mix in chocolate chips, shredded coconut, or nuts. You can also do two different flavors and layer them and make a vanilla-chocolate pudding pop for example.

Fruit Popsicles

A great way to make delicious fruit popsicles that are very similar and in my opinion better than Edy's Whole Fruit popsicles for example is to make them from frozen fruit at home. You could take slightly thawed (so it can be easily blended in a blender) frozen mixed berries, sugar to taste (if at all) and enough water to blend it. Blend in blender until thoroughly blended. Pour into popsicle molds and freeze and voila, delicious fruit popsicles at a fraction of the cost.

Yogurt Popsicles

A healthier alternative is to take yogurt and freeze them into pops too. A really yummy popsicle is to fill your popsicle mold 3/4 of the way with yogurt and top the rest with the fruit puree from the fruit popsicle recipe. Swirl it with your popsicle stick and freeze. So yummy!! You can also make a yogurt pop topped or swirled with granola and chopped bananas for a yummy breakfast treat. The options are endless!

When I make yogurt pops, I use a 32 oz. container of strawberry yogurt and 2 chopped up bananas. This makes 16 popsicles, the size you see above.

Here's a website that sells popsicle molds similar to what I had as a kid. You can do a search on google for "popsicle mold" and find lots of others too. This site sells them cheaper than what I paid for mine. http://www.crafthobbywholesale.com/default.aspx/General/FreezeItems/


Cheap popsicle molds can be hard to find. There are fancier molds but they can be rather pricey. These have those flimsy plastic popsicle sticks like mine did. I had to throw my sticks out because they just snapped too easily. When I was a kid we bought wooden craft sticks (popsicle sticks). I bought a box of 1000 for like $3.50 at Walmart about a month ago. It's cheap and you don't have to worry about them breaking or having to wash them. Plus you can make a ton of crafts out of them too. I used to make houses and all sorts of stuff out of popsicle sticks when I was younger. Let me know how you like them.


Popsicle/Craft sticks

Are you a good person?

http://atypicalchristianity.blogspot.com
http://titus2wifeandmommy.blogspot.com

Thursday, July 10, 2008

Very Best Brownies And Variations


This is a picture of my Mocha Chocolate Chip Brownie variation. I just combined the two.

These brownies require no more work than using a box mix and the flavor is better and you can customize them any way you like. I've given many recipe variations below from the basic brownie recipe. Save some money and make them from scratch from common household ingredients. You'll never want the box stuff again! These are super-easy and economical.

Very Best Brownies

1/2 c. vegetable oil (1 cup)
1 c. sugar (2 cups)
1 tsp. Vanilla (2 tsp.)
2 eggs (4 eggs)
1/2 c. unsifted all-purpose flour (1 cup)
1/3 c. cocoa powder (2/3 cup)
1/4 tsp. Baking powder (1/2 tsp.)
1/4 tsp. Salt (1/2 tsp.)
1/2 c. chopped nuts, optional (1 cup)

Blend oil, sugar, and vanilla in large bowl. Add eggs; beat well using spoon. Combine flour, cocoa, baking powder and salt; gradually add to egg mixture. Stir in nuts if desired. Spread into a greased 9 in. square pan. Bake at 350* for 20 to 25 min. or until brownie begins to pull away from edges of pan. Cool in pan. Cut into squares.

To double recipe: Use amounts in parentheses. Spread into a greased 13 X 9 in. pan. Bake at 350 deg. for 30-35 min. or until brownie begins to pull away from edges of pan. Keep an eye on it because oven cooking times will differ.

Turtle brownies

Make brownies as above, but when cooled drizzle melted caramel and chocolate on top and sprinkle on chopped pecans.

Praline-Iced Brownies

Use double recipe above.
5 tbs. butter
1/3 cup packed brown sugar
1 tbs. vanilla extract
2 tbs. water
2 cups confectioners' sugar
1/2 cup chopped pecans, toasted and coarsely chopped

Make the double recipe of the brownies above and cool. In 2 quart saucepan, heat butter and brown sugar over medium-low heat until mixture has melted and bubbles, about 5 minutes. Remove from heat. With wire whisk, beat in vanilla extract and water; stir in confectioners' sugar until smooth. With small metal spatula, spread topping over room-temperature brownies; sprinkle with chopped pecans.

Cream Cheese Brownies

Use double recipe above.
4 oz. room-temperature cream cheese
2 tbs. room temperature butter
1/4 cup sugar
1 large egg
2 tbs. all-purpose flour

Before transferring the batter to the pan, prepare cream cheese mixture. Mix the cream cheese with butter. Whisk in sugar, egg, and flour. Alternately spoon chocolate batter and cream cheese mixture into pan; with the tip of a paring knife, swirl to marble. Bake as directed above.

Chocolate Chip Brownies

Use single brownie recipe and add 1/2 cup of chocolate chips into batter instead of nuts or 1 cup of chocolate chips for double recipe. Bake as recipe directs.

Mocha Brownies

For single recipe of brownies above, add 2 tsp. instant espresso powder of instant coffee granules to oil, sugar, and vanilla mixture (Use 4 tsp. for double recipe). Make sure it's well blended. Continue recipe as directed.

Are you a good person?

http://atypicalchristianity.blogspot.com
http://titus2wifeandmommy.blogspot.com

Baked Lentils


This is probably one of our family's favorite recipes and it's very economical to make. It's slightly sweet and so tasty. I think it's really supposed to be a side dish like baked beans, but we use it as a main course all the time. Our favorite way to serve it is burrito-style. We fill a flour tortilla with the baked lentils and microwave some shredded cheddar cheese on top. Then we top it with lettuce, tomato, and then we drizzle it with some homemade french or russian dressing (I'll be posting these recipes as well) that I make. It's soooo delicious and very good for you. Lots of protein and fiber. Our young kids love it as well just topped with the melted cheddar cheese. I often triple the recipe because we go through it so fast.

Baked Lentils

1 cup lentils
2 1/4 cups water
1/2 cup onions, chopped
1 tsp. salt
1 tbs. brown sugar
1 tbs. ketchup
1 tbs. molasses
1/2 tsp. dry mustard
1/2 c. vegetable oil

Rinse lentils; drain. Combine lentils, water, onions and salt; bring to a boil. Reduce heat; cover and simmer 45 minutes. Add other ingredients; put in casserole dish. Bake uncovered at 350 degrees for 1 hour and 15 minutes. Stir occasionally. (Make sure you don't forget to stir it or it will scorch and get dried out.) Serves 4 to 6 people.

Are you a good person?

http://atypicalchristianity.blogspot.com
http://titus2wifeandmommy.blogspot.com