Tuesday, August 12, 2008
Sweet Dinner Rolls
These rolls turned out perfectly the first time I made them. They're slightly sweet and puff up real big. They have a moist, tender, and light texture. They'd be great for Thanksgiving!
Sweet Dinner Rolls
"Bread Machine Version"
Makes 24 rolls
1 1/2 cups water (110 deg. F.)
1 egg, room temperature
2 tbs. honey
2 tsp. vanilla extract
2 tbs. melted butter
1 tsp. salt
5 cups flour
5 tbs. white sugar
2 tbs. dry milk powder
5 tsp. wheat gluten
2 tsp. active dry yeast
1) Select dough cycle. If dough is too sticky, add more flour as it mixes.
2) When the dough cycle is complete, turn the risen dough out on a lightly floured surface and divide into 24 equal pieces.
I used a plastic pizza cutter/dough cutter to cut these. It worked great.
3) Form the pieces into rounds and place in greased 13 X 9 pan. Turn oven to 150 deg. for one minute and turn off. Cover the rolls with plastic wrap and let rise until doubled in volume on oven. (This took 50 minutes for me.) Take off plastic wrap.
To get nice round tops, tuck in dough underneath to leave a smooth, round top.
4) Bake in 350 deg. oven for 15 minutes, until golden brown.
http://atypicalchristianity.blogspot.com/
http://titus2wifeandmommy.blogspot.com/
Monday, August 11, 2008
Asian Brown Sauce
This is a really easy asian sauce that is sweet and yummy for dipping or topping chicken and vegetables over rice. It would be great in a stir-fry too. This recipe is great because it requires no fancy or expensive ethnic ingredients. This is also great served with Fried Tofu.
Asian Brown Sauce
1/2 cup granulated sugar
1 tbs. corn starch
1 cup chicken broth (I used 1 cup water and 1 cube chicken bouillon to save money.)
2 tbs. soy sauce
1 clove garlic, minced
In a saucepan, mix sugar and cornstarch. Stir in chicken broth and soy sauce. Cook and stir until mixture bubbles. Lower heat and add chopped garlic. Cook until thickened.
http://atypicalchristianity.blogspot.com/
http://titus2wifeandmommy.blogspot.com/
Fried Tofu
This is probably my favorite way to eat tofu now. It's nice because it doesn't have that mushy texture and it has a nice crispy coating. It tastes a lot like the fried tofu I liked getting at Asian restaurants. Now, you can easily make it at home.
Fried Tofu
16 oz. extra firm tofu
Tofu Mix:
5 tbs. sesame seeds (I got away with using 3.)
4 tbs. corn starch
4 tbs. all-purpose flour
1/2 tsp. salt
1/4 tsp. sugar
canola or vegetable oil for frying
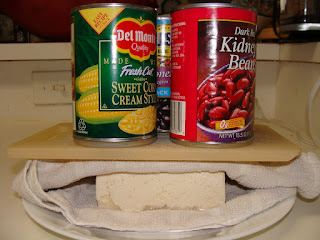
Place the drained block of tofu on a plate. Cover the tofu with a folded paper towel the size of the block of tofu. (I just used a clean dishcloth. It was more absorbent.) Then place another fairly heavy object on top. (I used a small cutting board and balanced 3 cans of vegetables on top to make a press.)
After about 5-10 minutes, remove the plate and throw away the wet paper towel. (You don't have to do this if you use the dishcloth.) Drain off the water that has been pressed out of the tofu. Now cover once again with a fresh paper towel and put it back on the plate. Press your tofu this way for 15 minutes.
Place pressed tofu on a cutting board and slice it into 1 inch cubes.
Stir together tofu mix ingredients and place in a pie plate or bowl. Roll the tofu cubes in the mixture until well covered. (You might have to reroll them because the tofu absorbs the coating quickly.) Place the covered tofu cubes on a plate next to the stove where you'll be frying.
Pour 1/2 to 1 cup of oil or other high-heat oil into a small frying pan. You want oil to be about 1 inch deep (If using a larger pan, you may need more oil.) You will also need tongs and a paper towel covered plate.
Place pan over medium-high heat. To test if your oil is hot enough, using tongs, dip a corner of a tofu cube in the oil. If it begins to sizzle and cook, the oil is ready.
Turn heat down to just above medium and fry the tofu. Using tongs, place the tofu cubes in the oil, allowing them to cook 1 minute or so (Mine took longer). Turn the tofu cubes over with your tongs to cook 1 minute on the other side, or until cubes are a light golden brown. When golden brown, remove from the oil and place on paper towels to drain.
This is served with the Asian Brown Sauce and rice.
Tips:
This is best when served hot because the coating stays crispy. Once it's microwaved, it gets soft.
You can also just dip it in the Asian Brown Sauce and it eat it like that.
This is also a healthy and great finger-food for the kids....literally!
http://atypicalchristianity.blogspot.com/
http://titus2wifeandmommy.blogspot.com/
Broccoli Salad
This broccoli salad is actually a combination of a few recipes in which I combined elements of them together to make the ultimate broccoli salad. This is great for barbecues, potlucks, or with lunch.
Broccoli Salad
1 large head of broccoli, chopped
1/2 cup chopped red onion
1 cup shredded cheddar cheese
3-4 slices fried bacon, chopped
1 cup raisins, optional (This is a great addition.)
Dressing
2 tbs. apple cider vinegar
1/4 cup sugar
3/4 cup mayonnaise
Mix first 5 ingredients together in a bowl. In a separate bowl, mix final 3 ingredients and pour over broccoli mixture. Stir well.
Refrigerate for 4 hours before serving.
http://atypicalchristianity.blogspot.com
http://titus2wifeandmommy.blogspot.com
Corn Casserole
This is the traditional corn casserole that always seems to show up at potlucks and around the holidays. If you've never had it, you've gotta try it! I always keep the ingredients on hand so I can whip it up real fast at a moment's notice. You can also use about 2 cups of frozen corn instead of the canned whole kernel corn for a fresher taste. This recipe couldn't be easier to make.
Corn Casserole
1 can creamed corn
1 can whole kernel corn
1 stick butter, melted
1 8oz. package sour cream
1 pkg. jiffy corn muffin mix
Stir together all ingredients and put in an 8 X 8 dish. Bake at 350 Deg. F. for one hour and top is browned.
http://atypicalchristianity.blogspot.com
http://titus2wifeandmommy.blogspot.com
Black Bean Burgers
These burgers are way better than they sound. I made a double batch of these last time and they didn't last that long. We stored them in the freezer for a quick meal. I top it just like a cheeseburger with ketchup, mustard, mayonnaise, cheese, and lettuce and tomato. These are cheap and delicious and good for you too!
Black Bean Burgers
Preparation Time: 10 minutes
Chilling time: 1 hour
Cooking Time: 10 minutes
2 cans (15 ounces each) Black Beans, rinsed and drained
½ cup all-purpose flour
¼ cup yellow cornmeal
½ cup chunky salsa
2 teaspoons ground cumin
1 teaspoon garlic salt
Hamburger buns
Place beans in food processor; process until fairly smooth. Add flour, cornmeal, salsa, cumin and garlic salt. Process until well combined. Spoon mixture into 6 balls on a large plate and refrigerate at least 1 hour or up to 4 hours before cooking.
Heat barbecue grill or ridged grill pan over medium heat. Coat grill or pan lightly with oil. Form each ball into a 4-inch patty about ½-inch thick. Place the patties on the grill or in pan and cook until browned and heated through, 4 to 5 minutes per side. (I just cooked these in a frying pan with olive oil and it worked just fine.)
Serve on hamburger buns with your favorite toppings.
http://atypicalchristianity.blogspot.com
http://titus2wifeandmommy.blogspot.com
Saturday, August 9, 2008
Peanut Butter And Jelly Popsicles And Variations
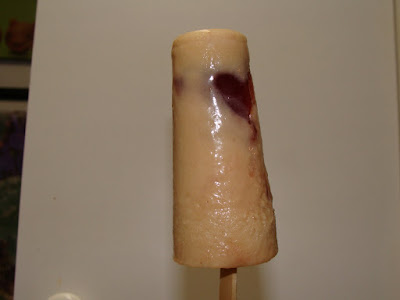
Try swirling the jelly a little more than I did for better results.
What's better than a peanut butter and jelly sandwich? Why, peanut butter and jelly popsicles of course. These didn't sound really good to me at first, but I gave it a try because it was different and used ingredients I always have on hand. These are so yummy. My kids are always asking for one for a snack and I love them too! Plus, they have lots of good-for-you protein too.
Peanut Butter And Jelly Popsicles
1 cup smooth peanut butter
2 cups plain low-fat yogurt (I used vanilla. It tastes better I think.)
2 cups milk
4 tbs. honey
4 tsp. vanilla extract
jelly of choice
1) Combine peanut butter, yogurt, milk, honey, and vanilla in a food processor or blender until smooth.
2) Pour mixture into popsicle molds, leaving 1/4 inch or so room on top for jelly. This depends on what size mold you have.
3) Microwave jelly, just until a little liquidy. (I didn't do this, but I bet it would help you mix it much better. I've done this with other recipes and it worked great.) Spoon 1 teaspoon jelly, (Use more, if you have a larger mold than I used.) on top of peanut butter mixture.
4) Use popsicle stick to swirl jelly into peanut butter mixture, then stand stick upright. (This didn't work so well for me because my jelly was too thick. This is why you should microwave it slightly.)
5) Freeze until solid, preferably overnight. Enjoy!!
This made 24 popsicles the size you see in the pictures.
Variations:
Add chopped up bananas instead of, or in addition to jelly, for a healthier treat.
Just have a plain ol' peanut butter popsicle. My husband likes them a lot this way. My favorite is with the jelly in it.
Try mixing in other ingredients and see what kind of flavor creations you can make.
http://atypicalchristianity.blogspot.com
http://titus2wifeandmommy.blogspot.com
Thursday, August 7, 2008
Slow-Cooked Pulled Pork
I wasn't a big pulled-pork fan until I tried this recipe. I used to just make it in the crockpot with store-bought barbecue sauce and it was always too sweet and chemical-tasting. This pulled pork is so delicious because of the homemade barbecaue sauce and the fact that it cooks forever in it's own juices and gets really tender. It's got a little sweetness, a little spice, and a whole lot of yummy goodness!
Slow-Cooked Pulled Pork
1 medium onion, choppped
1/2 cup ketchup
1/3 cup apple cider vinegar
1/4 cup packed brown sugar
1/4 cup tomato paste
2 tbs. sweet paprika
2 tbs. worcestershire sauce
2 tbs. yellow mustard
1 1/2 tsp. salt (I used House Seasoning instead of salt and pepper)
1 1/4 tsp. ground pepper
4 lbs. boneless blade roast (fresh pork butt), cut into 4 pieces
1) In a 4 1/2 to 6 quart slow-cooker pot, stir onion, ketchup, vinegar, brown sugar, tomato paste, paprika, worcestershire, mustard, salt, and pepper until combined. Add pork to sauce mixture and turn to coat well with sauce.
2) Cover slow cooker with lid and cook pork mixture on low setting as manufacter directs, 8 to 10 hours or until pork is very tender.
3) With tongs, transfer pork to a large bowl. (I put pork in fridge to cool and then pulled the fat off. The recipe doesn't say to do this, but I doubt you want to eat bites of fat. I know I don't!) Then turn setting on slow cooker to high; cover and heat sauce to boiling to thicken and reduce slightly.
4) While sauce boils, with 2 forks, pull pork into shreds. Return shredded pork to slow cooker and toss with sauce to combine. Cover slow cooker and heat through on high setting if necessary.
5) Spoon pork mixture onto bottom of sandwich buns; replace tops of buns.
http://atypicalchristianity.blogspot.com
http://titus2wifeandmommy.blogspot.com
Tuesday, August 5, 2008
Oat Nut Bread
This bread is very moist and you can't even taste or see the oats at all. The oats add a little healthiness to it without sacrificing flavor. The addition of sunflower seeds adds a nice texture to an already wonderful bread.
OatNut Bread
"Bread Machine version"
1 ½ pound loaf
INGREDIENTS
1 1/4 cups water (110 deg.)
2 tablespoons margarine melted
2 tbs. honey
1/2 cup sunflower seeds (I like to add this with the liquid ingredients so they get softer.)
1 teaspoon salt
3 cups all-purpose flour
1/2 cup rolled oats
3 tsp. wheat gluten
2 tablespoons brown sugar
1 1/2 teaspoons active dry yeast
DIRECTIONS
1. Add ingredients to bread machine pan in order listed. Use regular light setting. When bread is done, let it sit in pan outside of bread machine for 10 minutes otherwise you'll squash the top of your loaf when taking it out. Let it cool on a baking rack and slice once completely cooled.
TIPS:
1) When the dough is mixing, if it seems too dry and isn't sticking together, slowly add more water until it comes to the right consistency. A slightly, sticky formed ball of dough. If it's too wet, slowly add more flour until it comes to the right consistency.
2) I find that adding wheat gluten to the all-purpose flour seems to help the bread have a better consistency and it's cheaper than bread flour. You coud use bread flour instead of the all-purpose flour and wheat gluten if you prefer. I also found that using warm ingredients (not hot and not cold) make the bread rise just right.
3) Another tip, if you don't want some of your slices to break apart from the hole left by the paddle, take the dough out right before it gets to the third rise cycle, take the paddle out, spray it with cooking spray, and form the dough neatly and put it back. Then, you only have a tiny hole instead of a large slice through your bread left by the paddle. This also helps you not have a lop-sided loaf which can happen sometimes by the machine not forming the dough evenly.
http://atypicalchristianity.blogspot.com
http://titus2wifeandmommy.blogspot.com
Monday, August 4, 2008
Garlic Cheese Drop Biscuits
These biscuits are a souped-up version of my regular Drop Biscuits. These taste just like the biscuits they serve at Red Lobster while you're waiting for your meal and they're really quick and easy to make. Now, I don't need to go to Red Lobster just to get these great biscuits. I make a double batch and keep them on hand to go with dinner at a moment's notice. These are my absolute favorite!
Garlic Cheese Drop Biscuits
2 cups flour
1 tbs. baking powder
1/2 tsp. salt
1/3 cup shortening
1 cup milk
1 cup shredded cheddar cheese
Garlic Butter:
1/2 stick unsalted butter, melted
1/4 tsp. garlic powder
1/4 tsp. salt
1/8 tsp. dried parsley flakes
1) In mixing bowl thoroughly stir together the flour, baking powder, and salt. Mix well to evenly distribute the leavening (baking powder) and salt.
2) Cut shortening into flour mixture till mixture resembles course crumbs. Be sure to use solid shortening instead of cooking oil or melted butter. Don't mix by hand, but use a pastry blender or forks and knives.
3) After cutting in the shortening, the mixture should resemble coarse crumbs. Avoid blending the fat completely with the flour or using a liquid shortening. These produce mealy biscuits rather than the flaky, tender ones which are more desirable.
4) Gently push the flour-shortening mixture against the edges of the bowl, making a well in the center. Add the milk all at once, pouring it into the well.
5) Using a fork, stir the mixture quickly. Stir just till the dough follows the fork around the bowl and forms a soft dough. Too much mixing may result in biscuits that are tough and not as light as desired. Gently mix in the cheese.
6) Using a knife or a narrow spatula, push the dough from a tablespoon onto greased baking sheets to make 12 biscuits.
7) Bake biscuits in 450 deg. F. oven for 10 to 12 minutes or until biscuits are golden. Serve immediately.
8) While the biscuits are baking, make the garlic butter. In a small bowl, combine the butter, garlic powder, salt, and parsley flakes. As soon as you bring the biscuits from the oven, brush them with the garlic butter using a pastry brush. Serve while hot. Enjoy!
Makes 12 biscuits.
http://atypicalchristianity.blogspot.com
http://titus2wifeandmommy.blogspot.com
Super Easy and Quick Drop Biscuits
These biscuits are so yummy and so quick to make. I never used to make biscuits because I could never seem to get them right with rolling and cutting them out and they were always dry and took forever to make. So, I would wait for Pillsbury biscuits to go on sale, but I still was spending about $1.67 for 8 biscuits. I don't know how much these cost to make, but they have got to be a fraction of the cost and you get 12 biscuits instead. I make a double batch of these and keep them stored in the freezer to serve with dinner at a moment's notice.
Drop Biscuits
2 cups flour
1 tbs. baking powder
1/2 tsp. salt
1/3 cup shortening
1 cup milk
1) In mixing bowl thoroughly stir together the flour, baking powder, and salt. Mix well to evenly distribute the leavening (baking powder) and salt.
2) Cut shortening into flour mixture till mixture resembles course crumbs. Be sure to use solid shortening instead of cooking oil or melted butter. Don't mix by hand, but use a pastry blender or forks and knives.
3) After cutting in the shortening, the mixture should resemble coarse crumbs. Avoid blending the fat completely with the flour or using a liquid shortening. These produce mealy biscuits rather than the flaky, tender ones which are more desirable.
4) Gently push the flour-shortening mixture against the edges of the bowl, making a well in the center. Add the milk all at once, pouring it into the well.
5) Using a fork, stir the mixture quickly. Stir just till the dough follows the fork around the bowl and forms a soft dough. Too much mixing may result in biscuits that are tough and not as light as desired.
6) Using a knife or a narrow spatula, push the dough from a tablespoon onto greased baking sheets to make 12 biscuits.
7) Bake biscuits in 450 deg. F. oven for 10 to 12 minutes or until biscuits are golden. Serve immediately.
Makes 12 biscuits.
This is my favorite way to have these biscuits. Butter and jam!
This is my hubby's favorite way. He likes to have biscuits with sausage gravy.
To make these extra yummy, melt 1/2 stick butter, and using a pastry brush, brush on biscuits immediately after they get out of the oven. Mmmmmm!
Check out my Garlic Cheese Drop Biscuit variation by clicking here. These taste just like the yummy biscuits they give you while you're waiting for your food at Red Lobster. These take hardly any more time to make and they are really good!
http://atypicalchristianity.blogspot.com
http://titus2wifeandmommy.blogspot.com
Peanut Butter Chocolate Chip Cookies
These cookies are a version of my Mom's Christmas Box Peanut Butter cookies I used to make with my Mom a lot when I was a kid. We made them without the chocolate chips and made the traditional criss-cross pattern on the top with the tines of a fork. My husband is a huge fan of peanut butter with chocolate, so I decided to make this treat a little more interesting with the addition of chocolate chips. I like these cookies even better now!
Peanut Butter Chocolate Chip Cookies
1/2 cup shortening
1/2 cup (1 stick) butter
1 cup granulated sugar
1 cup packed brown sugar
2 eggs
2 1/2 cups flour
1 1/2 tsp. baking soda
1 tsp. baking powder
1/2 tsp. salt
1 cup chocolate chips
1) In a large bowl, mix shortening, butter, and sugars with electric mixer on medium until blended. Then add eggs and mix on low until blended well.
2) In a small bowl, whisk together flour, baking soda, baking powder, and salt. Add to other ingredients in large bowl and mix by hand until combined well. Then mix in chocolate chips. Cover and chill. (I didn't need to do this because my dough held together really well.)
3) Heat oven to 375 deg. F. Shape dough into 1 inch balls. Place 2-3 inches apart on lightly greased baking sheet. Press to flatten to about 2 inches wide with the palm of your hand or the bottom of a measuring cup.
4) Bake 7-9 minutes or until set but not hard. Cookies firm up and brown more once out of the oven, so take them out earlier than you think you need to.
Makes about 6 dozen cookies.
To make regular peanut butter cookies, omit chocolate chips, and use a fork dipped in flour and flatten the dough balls to 2 inches wide. Bake the same. You could also try rolling the dough balls in coarse or turbinado sugar to cookies before flattening with a fork. I haven't tried that with this recipe, but I did do it with a pecan ball recipe and it made the cookies really yummy and they had a nice sweet crunch on the edges.
http://atypicalchristianity.blogspot.com
http://titus2wifeandmommy.blogspot.com
Friday, August 1, 2008
Lentil and Spinach Puffs
These are a very yummy and healthy treat. You could serve them as an appetizer with a dipping sauce for a party or have as a side dish with your meal. They're a great finger food and cheap to make. I like to double this recipe.
Lentil and Spinach Puffs
3/4 cup dried lentils
3 tbs. water
2 tbs. chopped onion
16 oz. frozen spinach thawed, and squeezed dry
3/4 tsp. salt
1 garlic clove, minced
2 tsp. flour
1/8 tsp. baking powder
peanut or vegetable oil
1) Sort and wash lentils; place in a bowl. Cover with water to 2 inches above lentils. Cover and refrigerate 8 hours or overnight.
2) Drain lentils well. Place lentils, water, and onions in a food processor; process until smooth, scraping down sides occasionally. Combine the pureed lentil mixture and remaining ingredients (excluding oil) and mix well.
3) Heat oil (as much as needed to coat bottom of pan) in a large nonstick skillet over medium heat. Drop lentil mixture by heaping tablespoons into pan. Flatten slightly with bottom of spatula. Cook 2 minutes on each side or until browned and heated through. Remove from pan. Cover and keep warm. Repeat procedure with remaining lentil mixture.
Here's my 2 1/2 year old son Camden helping me stir the mixture. He loves to cook!
This is them cooking in the pan. Make sure you add more oil as necessary and adjust the temperature if needed so they don't burn.
I just had this for my main course for dinner tonight. I liked them that much! I drizzled(or rather slathered them) with my Homemade Russian Dressing and sprinkled them with Lawry's Garlic Salt. Yumm-o!
http://atypicalchristianity.blogspot.com
http://titus2wifeandmommy.blogspot.com