This recipe is a variation off a Coffee Jelly recipe I found which is something that is apparently served in Japan. The idea sounded interesting but I don't like coffee so much, but rather coffee flavoring in things. That recipe needed some cream and sugar I thought, so I decided to make up Cappuccino Jello. This turned out really tasty and tasted just like an iced coffee or a frappuccino. Really yummy and healthier than the artificial coloring and flavoring fruit varieties at the store. Even the kids loved it too!
Cappuccino Jello
3 cups boiling water
1/4 cup instant coffee (I think Nescafe tastes the best, a lot of varieties are bitter and nasty)
1/2 cup sugar
1 cup half and half (you could probably use milk too)
2 packets unflavored gelatin
Stir boiling water, instant coffee, and sugar together until dissolved. Add the 2 packets of gelatin to a bowl with the half and half or milk. Wait 1 minute and then stir it with a whisk. Add it to the water mixture and whisk until well dissolved, about 5 minutes. Put in fridge in dessert cups or container for 4 hours or more until well chilled and set. To serve, top with whipped cream or cool whip if desired and caramel sauce for an even tastier treat. I topped mine with cool whip and homemade caramel sauce and it tasted like a caramel frappuccino. It was so yummy! Without it, it tasted like a plain cappuccino which was a bit plain for me and too coffee tasting, but I loved the extra flavor the caramel sauce added and the creaminess from the cool whip.
You could also try adding fudge sauce or chocolate syrup instead on top. You could also substitute flavored or non-flavored brewed coffee instead of the instant coffee and water if you prefer. To make a thicker, more jello jigglers style jello, add another packet of gelatin. You could then cut it in cubes. You can half this recipe if it makes too much or if you have a smaller family than me. If you really like the taste of coffee, try 4 cups of coffee with no half and half (which is then coffee jelly) and you can adjust the sugar to your liking. Have fun and mix it up!

Friday, December 14, 2012


Thursday, December 6, 2012
Hot Fudge Sauce

This hot fudge sauce recipe makes a rich, chocolatey, thick hot fudge sauce that is a great compliment to lots of desserts. No need to spend a ton of money on a small jar of fudge sauce at the store that has all those chemicals in it and doesn't even taste good. Try this recipe! It would be great to give in decorative half pint mason jars for a delicious gift. Make sure it stays refrigerated.
Hot Fudge Sauce
Ingredients
1 3/4 cups heavy cream (I use half and half because it's cheaper or you can use evaporated milk, but it tastes a little different)
3/4 cup brown sugar
1/4 cup butter, cut into small pieces
2 3/4 cups semisweet chocolate chips
1/8 tsp. salt
1 tsp. vanilla extract
Directions
In a heavy bottomed saucepan over low heat, bring the cream just to a boil then add the brown sugar and stir just until it dissolves. Add small pieces of butter and mix until completely melted, then stir in the chocolate chips. Wait a few minutes for chocolate to soften before folding it in with a spatula. Stir in the salt and vanilla extract and blend until well incorporated. Let cool for 15 minutes. It will thicken as it cools. This recipe makes a lot and you could easily half it. It stores in the fridge for weeks. It's the consistency of a soft fudge when in the fridge, so it's too thick to drizzle on top of things. To soften, scoop out desired amount into microwave safe bowl and microwave in 15 second increments and stir. It doesn't take much to soften it at all and you don't want to scorch it.
This sauce is great drizzled over ice cream, cheesecake, brownies, cookies, or whatever you like!
Thursday, June 14, 2012
Berry Sauce - Great for yogurt, ice cream, pancakes, or whatever!

Some of the sauces I have made are pineapple, blackberry, mixed berry, peach, cherry berry, strawberry, cherry, and orange pineapple.
Berry Sauce
9 cups of crushed berries
6 cups sugar (can use more or less, depending on tartness of berries)
I used to make my sauces by crushing berries, but I inevitably got some large pieces of berries and chunks here and there in my sauce and I didn't care for the texture very much. Now, whenever I make a sauce or jam, I puree my fruit in the blender. It gives a great smooth and thicker texture and no more chunks or lumps in my sauce or jam. It looks really pretty too!
Combine berries and sugar in a large saucepot. I typically will double this recipe to make more pints at a time. Bring slowly to a boil, stirring until sugar dissolves. Ladle into pint or half-pint jars, leaving 1/4 inch headspace. Wipe rims of jars to make sure they're clean, top with lids and rings. Process 15 minutes in a boiling water bath canner. Often times I will make a few half-pints too, along with my pints. I process them the same amount of time and then I have great gifts to give to friends. My favorite sauce I've made so far is Cherry Berry Sauce which had cherries, blueberries, blackberries, and strawberries, all mixed together. So delicious! It kind of tasted like one of those Edy's 100% berry fruit bars in a melted form.

This is a picture of my Homemade Sweetened Vanilla Yogurt topped with my Cherry Berry Sauce, fresh blueberries, and Skillet Granola.
Homemade Sweetened Vanilla Yogurt - Thick, creamy, and way better than store-bought and cheap too!
I searched high and low on the internet for a homemade sweetened vanilla yogurt recipe to no avail. So, I had to make up my own through trial and error. This yogurt is so delicious, super-thick and healthy for you. No need to waste your money on those ridiculously expensive Greek yogurt containers to get thick yogurt. Best of all, it's really easy to make homemade yogurt. No special equipment or ingredients needed. No yogurt makers, coolers, starters, or anything. Those are gimmicks anyways for people to make money off of you and totally not necessary. Don't buy into it.

Homemade Vanilla Yogurt
Ingredients:
1 gallon whole milk
1 1/2 cups sugar
6 tbs. vanilla extract
1 cup plain yogurt
1/2 cup cold milk
3 envelopes unflavored gelatin (optional)
The recipe may seem complicated by all the directions, but I just like to
leave all my notes and tips in there so there's no confusion on how to
make it. But, if you have any questions, just ask.
This recipe is for a gallon of yogurt, which is what we make (we have 5 in our family) and it lasts for a few weeks or maybe longer without spoiling. We just usually have it all
eaten up by then. You could half this if necessary.
Directions:
1) I
take one gallon of milk and put it in a large pot on the stove on
medium heat. I warm it up to 180 degrees. I use a meat thermometer, or you could use a candy thermometer just fine. It takes somewhere around a
half hour on our stove. I've accidentally forgotten about it on the
stove before and it's gotten up to 220 and still had it work, although
the pot was about to boil over at that point. I don't stir my pot
either, but just let it sit. This makes it really easy. It will get a skin on top like cooked
pudding will, but I just take a whisk and scrape it off and dump it in
the trash once it's cooled down. It's much easier than having to stir
the pot non-stop and I've never had my milk scorch or burn this way
despite not stirring it. If you don't heat it at least up
to 180, it won't set right. So, once your milk is up to 180, take it
off the burner and let it cool to 110 degrees. It takes much longer to
cool than to warm up, about an hour.
2) I
take the skin off like I said, and then mix 1 1/2 cups of sugar into
the pot with a whisk until dissolved. We used to use 2 cups of sugar,
but since we like to add a fruit sauce and granola on top of our yogurt,
it can be a bit too sweet. 1 cup of sugar was too sour for us, but do
it to your tastes. I also add 6 tbs. of vanilla extract and whisk that
in.
3) In
a small bowl, I take
about 1/2 cup of cold milk and take 3 envelopes of unflavored Knox
gelatin. I've used 2 envelopes and it didn't thicken it up. When I used 4 envelopes, it was like eating yogurt Jello. Not the right consistency. 3 is just right. You can omit this step entirely if you don't want to use
gelatin. It still makes a delicious and very thick yogurt, but when you
use the gelatin, it stays really thick and we just love it this way.
Sprinkle your gelatin on top of the cold milk in the bowl and let it sit
for about 2 minutes, then stir. It will be the consistency of baby rice cereal or a
soupy oatmeal. Then, whisk it in quickly into your sweetened warm
milk. Make sure you get out any lumps. If you add the gelatin straight
to the warm milk, it will set up the gelatin and it won't mix in. If
you let the gelatin sit in the cold milk too long, it will get too thick
to mix in the milk and won't dissolve easily. The trick is to just
wait a few minutes until soupy, then stir it in quickly.

This is what it looks like after a few minutes.

This is the soupy consistency once it's stirred.
4) Then,
add 1 cup of unsweetened plain yogurt. I like to use Dannon plain
yogurt in a 32 oz. container. That container has about 4 cups of
yogurt and will last my family about a month and still be fresh and make
4 gallons of yogurt. Some people say you can use your
homemade yogurt as a starter, but I've never done that. Since my yogurt
is sweetened and thickened, and not plain, I don't know if it would
work anyways. Also, I've heard that the more you use your homemade
yogurt as a starter, the more sour each batch gets. I just simply buy
the store-bought plain yogurt instead. Whisk the plain yogurt into your
pot very slowly. If you whisk it too fast, you'll mess up the cultures
and it won't set right. Just whisk slowly until most of the yogurt is
mixed in
well.

Then,
pour your milk mixture into a container. I use 2 glass Pyrex 2.75 qt.
containers with lids. This holds exactly 2 gallons for me.

I take two
thick bath towels and lay them on my counter and stack my containers
inside. I wrap the towels around the containers to keep them
insulated.

5) I let it sit for 14 hours. I've done anywhere between 8 and
20 hours before, but 14 seems to work pretty good for me. Depending on
the temperature inside your house and the time of year, it may affect
how long you want it to set out. Then, after 14 hours, set your yogurt
in the fridge. Don't stir it or mess with it, but let it sit in the
fridge for about a day to set up and get cold. Then, enjoy! Once you
dig into
the yogurt, after a while, some whey will separate out. You can simply
use it in a recipe or smoothie, or drain it off. If I don't use the gelatin, when
the whey separates from the yogurt over time, the yogurt tends to get
soupier and soupier and mixes in with the whey. I would then use it in smoothies or something.
But, when I use the gelatin, the yogurt stays thick and doesn't mix in
with the whey. It stays thick to the end and we love how thick and
yummy this yogurt is.
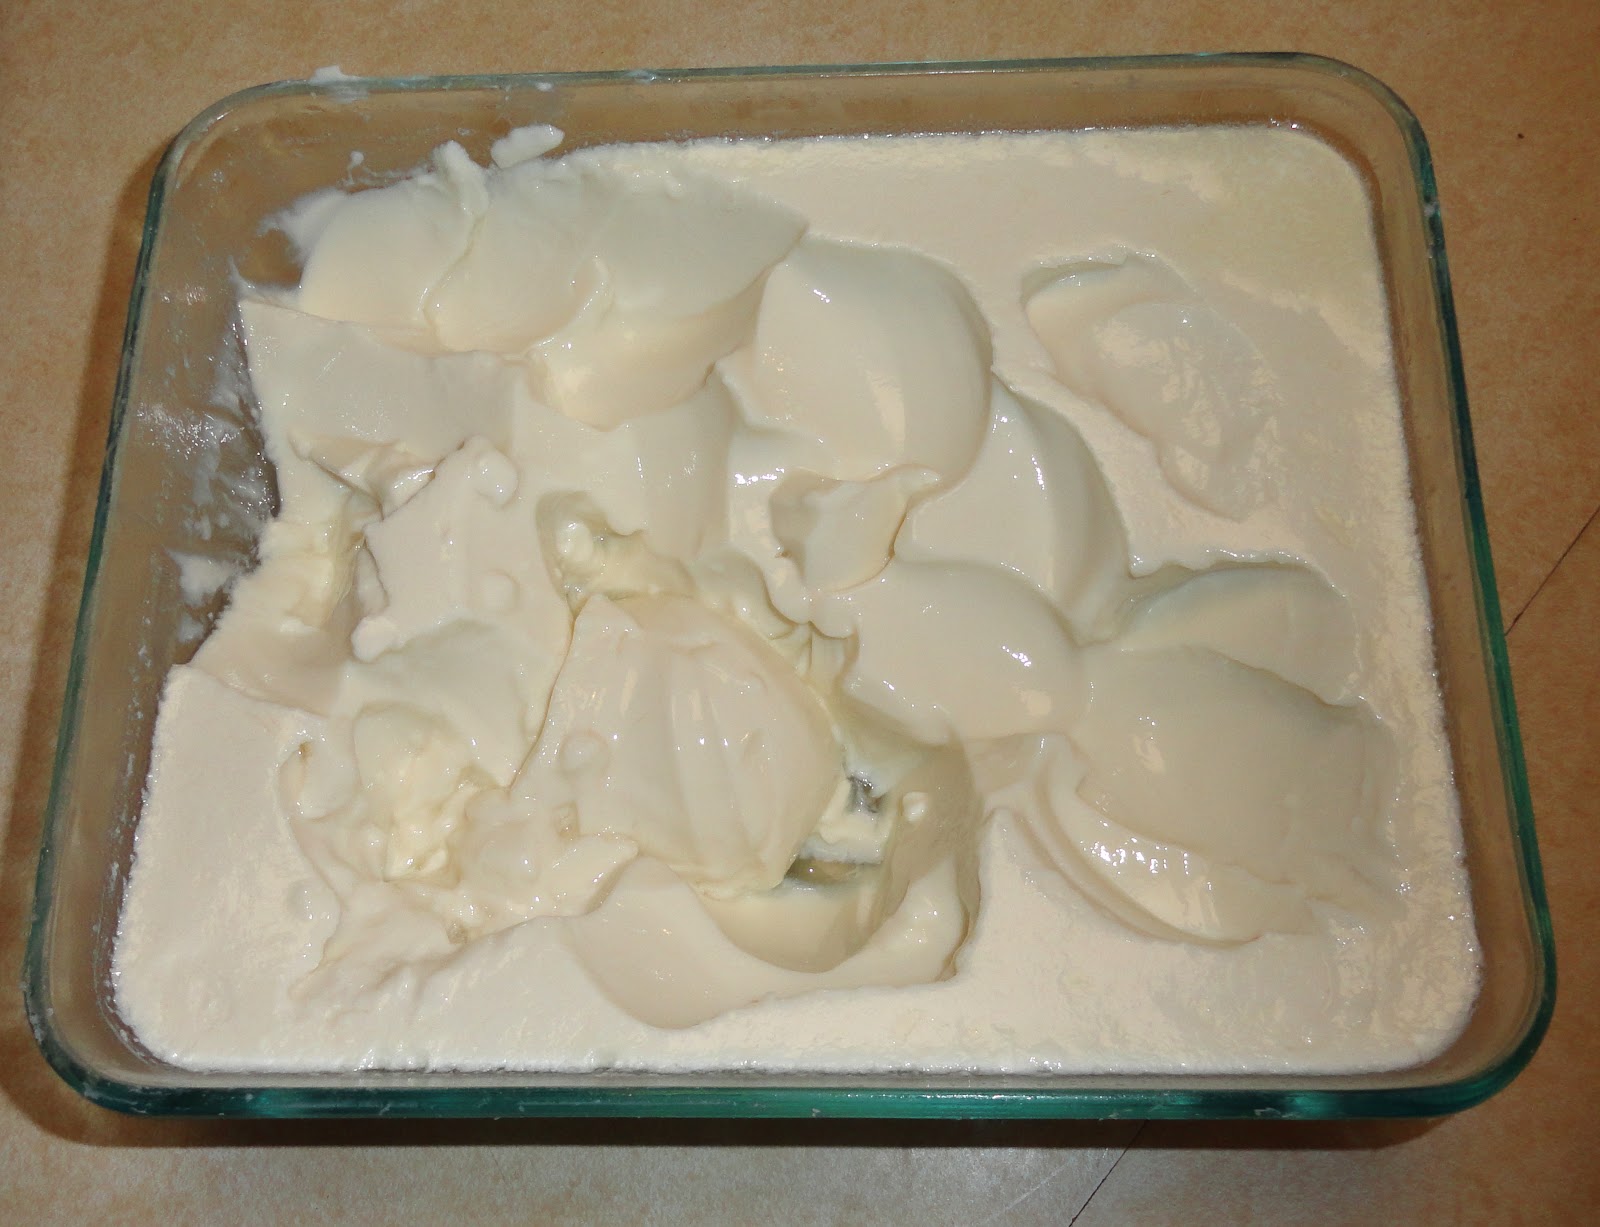
This is how thick the yogurt still looks after being dug into several times. It holds it's shape well.
This is great served with a homemade fruit sauce. (I make this all the time by making a jam recipe and just not using pectin.) Top with fresh fruit and Skillet Granola and you have a delicious breakfast!
Your Savings:
This is way cheaper than buying store-bought yogurt and it tastes way better and fresher and has only a few ingredients. You can make many types of flavored yogurts by simply changing the type of sauce you top it with. To make 4 gallons of homemade yogurt, it would cost whatever 4 gallons of milk costs (or free, if you have your own cow). Lets say around $14, plus a container of store-bought plain yogurt, approximately $3, plus the minimal cost of sugar and vanilla and a little more if you use the gelatin packets. Lets say around $19 to make 4 gallons of yogurt. If you bought 4 gallons of store-bought vanilla yogurt, that could run you around $48 if 32 oz. yogurt cost you around $3. That's a savings of almost $30, more or less depending on the cost of your ingredients. Much cheaper if you have a dairy cow. This is a cheap and healthy way to make a delicious breakfast for your family. Throw yogurt in smoothies or make homemade yogurt popsicles. So good!
Tuesday, September 14, 2010
Cheese Blintzes

(This is not my picture, but looks the most like it that I could find. When I take a pic, I'll post it.)
These cheese blintzes weren't very hard to make and went over really well at our weekly church potluck this past Sunday. I've never tried cheese blintzes before this recipe, so I have no idea if they're the way they're supposed to taste, but either way, they were really good!
Ingredients:
1 (1 pound) loaf white bread (I used wheat)
4 tablespoons white sugar
2 teaspoons ground cinnamon (I made up my own cinnamon sugar without the recipe and I used probably double the amount of cinnamon sugar called for and had more cinnamon in it too. It added a lot of flavor with the extra cinnamon sugar.)
2 (8 oz.) packages cream cheese, softened
2 tablespoons milk
1/4 cup granulated sugar
2 teaspoons vanilla extract
1/2 cup butter melted
1)Preheat oven to 350 degrees. Spray a cookie sheet generously with non-stick cooking spray.
2) Trim crusts from bread and roll the slices flat with a rolling pin. (I didn't bother to trim the crusts and it was quicker and still tasted fine.)
3) In a pie plate, combine sugar and cinnamon to make a mixture.
4) In a large mixing bowl, with electric mixer, mix softened cream cheese, milk, sugar, and vanilla until smooth. Spread this mixture onto each slice of flattened bread. (I laid all my slices out on the counter and spread it out on all of them before rolling them up to make sure each slice was evenly coated and that I didn't run out.) Roll up bread with filling in the middle and cut in half. Using a pastry brush, brush the halves with melted butter, evenly coating it. Then, roll each half in the cinnamon sugar. Coat it well. Then put the blintzes on the prepared cookie sheet. Repeat for all blintzes.
5) Bake for 10 minutes. You can serve these hot, cold, or lukewarm. They taste good all ways. See which you prefer best!
Tuesday, August 10, 2010
Refreshing Summer Lemonade

This is a very simple and quick lemonade to make that is refreshingly delicious, especially in the hot summer months. There's rarely been a lemonade I liked, but I love this one. It's sweet and slightly sour. I don't like overly sour lemonades at all. Below, you can also find a strawberry lemonade variation. Hope you enjoy!
2 cups lemon juice (can use fresh, but I just use the bottled kind on the shelf)
3 1/2 cups sugar (can use less if too sweet for your tastes)
1 gallon of water
1) Fill a 2 cup microwaveable pyrex cup with water up to 2 cups. Microwave for 2 minutes. Pour into a gallon size Rubbermaid pitcher or cleaned milk gallon container.
2) Add sugar, put on lid and shake to dissolve sugar, or if in an open-topped pitcher, stir with spoon until dissolved.
3) Add 2 cups of lemon juice and fill to the top of gallon container with water. Shake or stir to mix. Add fresh lemon slices or mint if desired. (I don't bother.) Best, if chilled for a bit before serving, or add to a cup of ice. Enjoy!
For a DELICIOUS Strawberry Lemonade version:
Don't fill all the water to the top of pitcher, otherwise you'll run out of room. Fill a blender about half full of lemonade and add frozen strawberries, perhaps 2 cups or whatever you desire. I like a lot of strawberries! Blend until smoothie-like consistency. Pour back into lemonade container, stir or shake to mix and enjoy a delicious, pink, strawberry lemonade that's sure to be a favorite.
Monday, July 12, 2010
Homemade Ranch Dressing Mix - For Dressing or Dip

Ranch Dressing Mix
Hidden Valley Ranch packets used to be my favorite way to make homemade ranch dressing, but it can get expensive. I knew there had to be a way to make your own from common household ingredients. This version has more flavor and a little bit of zest. Great over a grilled chicken salad, or with your favorite fresh veggies. I always have some in the fridge made up and ready to go!
2 tbs. plus 2 tsp. dried minced onion
1 tbs. dried parsley flakes
1 ½ tsp. paprika (I like the dark red smoked kind best, but it will make your ranch a bit red)
2 tsp. sugar
2 tsp. salt
2 tsp. pepper
1 ½ tsp. garlic powder
In a small bowl, combine the ingredients well. I use a food processor to blend it up better. It can store in an airtight container in a cool, dry place for up to 1 year.
To make ranch dressing:
In a bowl, combine 1 tbs. dry mix with 1 cup mayonnaise. Add 1 cup of buttermilk and mix again; refrigerate. Yield: 2 cups.
Instead of buying fresh buttermilk, you can reconstitute the powdered kind at the store, but it’s not nearly as good as the fresh.
To make ranch dressing dip:
In a bowl, combine 1 tbs. dry mix (I used a bit more for more flavor) and 1 cup sour cream; refrigerate for at least 1 hour before serving. Yield: 1 cup.
Eggplant Parmesan

Eggplant Parmigiana
This has got to be probably the best eggplant parmesan I’ve ever had. We think it’s better than Olive Garden’s, which used to be our favorite. This recipe is very easy and so delicious!
2 eggplants (2 ½ lbs.), cut in ½ inch thick round slices
¼ cup olive oil (no need to really measure this, just use what you need)
3/4 tsp. salt (use as much as you want)
½ tsp. pepper (use as much as you want)
1 26 oz. jar pasta sauce
1 ½ cups mozarrella cheese (you could use more...yum!)
1 cup grated parmesan cheese
italian seasonings, basil, or whatever you like
1) Broil eggplant preferably on a broiler rack, in oven in approximately 2 batches. Layer half of eggplant on broiler rack and brush with oil. Sprinkle with salt and pepper. Broil 4 inches from heat for 6 to 8 minutes per side until lightly browned and tender. Flip eggplant and do the same on the opposite side. Do the same with the second batch of eggplant.
2) Spread ½ cup of pasta sauce in lasagna pan. Line with ½ the eggplant. Spoon on 1 ¼ cup more of sauce, top with 1 cup of mozzarella, remaining eggplant, sauce, and mozzarella. Sprinkle with the parmesan and seasonings. Cover with foil.
4) Bake at 350 degrees for 45 minutes or until bubbly and cheese is browned. Let sit 15 minutes before serving. Enjoy!

CREAMY SPINACH DIP

CREAMY SPINACH DIP
This dip is so easy and sooo delicous! Great with crackers, fresh veggies, or as filling for a bread bowl. This is a very popular dip at potlucks.
1 cup mayonnaise
1 package Knorr Vegetable recipe mix
1 package (10 oz.) frozen chopped spinach, thawed and squeezed dry
1 container (16 oz.) sour cream
Combine all ingredients. Chill 2 hours. Makes approximately 4 cups dip.
Tuesday, April 27, 2010
White Chocolate Mixed Berry Cheesecake


This cheesecake is a twist off my basic New York Cheesecake that I make. I entered this in our church cake contest and won first place. This is probably my most favorite variation I've made. Perfect for spring!
White Chocolate Mixed Berry Cheesecake
Cookie Crust
1 ½ cups of crushed oreos including cream centers (easiest to do in food processor)
Mixed Berry sauce
2 cups of frozen mixed berries, thawed and pureed in the blender
1/3 cup sugar
2 tsp. cornstarch
½ cup water
Cheesecake
1 cup white chocolate chips
¼ cup half and half
3 (8oz) pkgs. Cream cheese, softened
1 ¼ cups sugar
4 eggs
2 tsp. lemon juice
2 tsp. vanilla extract
1 cup white chocolate chips
1) Preheat oven to 350 degrees.
2) Put crushed oreos in bottom of cheesecake pan and press evenly over bottom and up sides.
3) In a saucepan, combine berry puree, sugar, cornstarch, and water. Bring to a boil over medium high heat and continue boiling for 5 minutes, or until sauce is thicker.
4) In microwave safe bowl, mix 1 cup white chocolate chips and half and half. Microwave 30 seconds, stir, and microwave 30 seconds more and stir until completely blended. Let cool.
5) Beat cream cheese and sugar at medium speed in large bowl until blended. Beat in eggs, vanilla, and lemon juice until blended. Stir in white chocolate chips and half and half mixture. Add 1 cup of white chocolate chips and stir well.
6) Pour half of cheesecake batter into pan. Spoon 3 tbs. of berry sauce on top and use a knife to swirl. Add the rest of cheesecake batter and spoon 3 more tbs. of berry sauce on top and use a knife to swirl. Save remaining sauce in the fridge for a topping.
7) Bake in oven for 55 minutes to 1 hour or until filling is set. Cool, and refrigerate in the fridge overnight. Serve with remaining berry sauce, fresh berries, white chocolate shavings, or whatever you like.

You could substitute blueberries or strawberries instead of the mixed berries.
Wednesday, April 7, 2010
Easy and Versatile Potato Salad
I used to think potato salad was hard to make and required a recipe, but now I know it's very easy and you can make it however you want and can easily make it for a crowd without having to double or triple a small recipe. My mother-in-law makes a really good potato salad (My husband's favorite, until mine.) and I liked it, but wanted more mayo and seasonings. Once she showed me how to do it, I realized just how easy potato salad is to make and now I no longer follow a recipe. Who needs to! So, this is how I make it. Sorry, it's not specific, but this is the general guidelines and you can find what works for you and make your own signature potato salad. Everyone likes it a little different. (I'll post a picture when I make it next.)
Potato Salad
Potatoes (as many as you like) Once cooked, let sit in fridge until completely cold and then if desired, peel skins off potatoes (This is what I do). I can typically do this with my hands because they come off pretty easy. Chop to desired size.
Eggs (as many as you like - we like a lot!) Put in fridge. When cold, chop eggs up.
Mayonnaise (as much as you need) Some people like a really dry potato salad and others like a lot of mayo. I'm more on the mayo side, but don't overdo it!
Seasonings (whatever you like best and as much as you like) I personally love a lot of the House Seasoning in it. Gives it great flavor. Most potato salads I try, in my opinion don't have enough salt and therefore don't have enough flavor. I also add some dill sometimes, perhaps extra garlic powder or onion powder, and sometimes I like to add dried onion flakes because it gives you the yummy onion taste without being as strong as fresh chopped onions. Make sure if you use the dried onions, you let your potato salad sit a while so the onions get softer. My typical recipe just uses House Seasoning to taste though.
If desired, you can add chopped celery, or chopped bacon, or whatever you like in your potato salad. I just do mine with eggs, potatoes, mayo, and seasonings and love it best that way!
Mix all ingredients in a bowl (do eggs last, otherwise they'll turn to a paste- been there, done that) Once you've got desired taste and consistency, add eggs. Season more or add more mayo if necessary. Sit in fridge for several hours to get cold and have flavors mix. Enjoy!
Cooking Directions:
Potatoes - Microwave without poking holes in them for 9 minutes or until potatoes are tender all the way through when pierced with a fork. The easiest and tastiest way to microwave potatoes is to get them wet and wrap completely in a slightly damp kitchen towel. This steams the potatoes and they don't dry out like they do when you poke holes in them with a fork. (This makes a great baked potato for dinner!) You can also boil them in the skins until they are done.)
Eggs - The easiest and most fool-proof way I've found to hard boil eggs is to get a large enough pot to put your eggs in a single layer on the bottom. Then, fill it with COLD water and cover eggs with 1 inch of water above them. Put on burner on high and wait until a full rolling boil. (This is where I always went wrong because as soon as it would start to boil, I would take it off the burner. You must wait until it's a boil that is very hard and bubbling and not stopping.) Then, as soon as it's a full rolling boil, take off burner and cover with lid. After 18 minutes, pour out hot water and run cool water over eggs. This will make a dry, but not too dry yolk, like you would get at a restaurant on a salad. It might take a few times to get it just right, so don't give up. I make egg salad sandwiches all the time with this. It's also a great way to use up eggs that didn't get cooked enough in the middle. No one will ever know!
Potato Salad
Potatoes (as many as you like) Once cooked, let sit in fridge until completely cold and then if desired, peel skins off potatoes (This is what I do). I can typically do this with my hands because they come off pretty easy. Chop to desired size.
Eggs (as many as you like - we like a lot!) Put in fridge. When cold, chop eggs up.
Mayonnaise (as much as you need) Some people like a really dry potato salad and others like a lot of mayo. I'm more on the mayo side, but don't overdo it!
Seasonings (whatever you like best and as much as you like) I personally love a lot of the House Seasoning in it. Gives it great flavor. Most potato salads I try, in my opinion don't have enough salt and therefore don't have enough flavor. I also add some dill sometimes, perhaps extra garlic powder or onion powder, and sometimes I like to add dried onion flakes because it gives you the yummy onion taste without being as strong as fresh chopped onions. Make sure if you use the dried onions, you let your potato salad sit a while so the onions get softer. My typical recipe just uses House Seasoning to taste though.
If desired, you can add chopped celery, or chopped bacon, or whatever you like in your potato salad. I just do mine with eggs, potatoes, mayo, and seasonings and love it best that way!
Mix all ingredients in a bowl (do eggs last, otherwise they'll turn to a paste- been there, done that) Once you've got desired taste and consistency, add eggs. Season more or add more mayo if necessary. Sit in fridge for several hours to get cold and have flavors mix. Enjoy!
Cooking Directions:
Potatoes - Microwave without poking holes in them for 9 minutes or until potatoes are tender all the way through when pierced with a fork. The easiest and tastiest way to microwave potatoes is to get them wet and wrap completely in a slightly damp kitchen towel. This steams the potatoes and they don't dry out like they do when you poke holes in them with a fork. (This makes a great baked potato for dinner!) You can also boil them in the skins until they are done.)
Eggs - The easiest and most fool-proof way I've found to hard boil eggs is to get a large enough pot to put your eggs in a single layer on the bottom. Then, fill it with COLD water and cover eggs with 1 inch of water above them. Put on burner on high and wait until a full rolling boil. (This is where I always went wrong because as soon as it would start to boil, I would take it off the burner. You must wait until it's a boil that is very hard and bubbling and not stopping.) Then, as soon as it's a full rolling boil, take off burner and cover with lid. After 18 minutes, pour out hot water and run cool water over eggs. This will make a dry, but not too dry yolk, like you would get at a restaurant on a salad. It might take a few times to get it just right, so don't give up. I make egg salad sandwiches all the time with this. It's also a great way to use up eggs that didn't get cooked enough in the middle. No one will ever know!
Wednesday, March 24, 2010
BUTTERCREAM ICING / FROSTING

This icing is so delicious and makes even a boxed cake taste good. It's better of course with a homemade cake too! No need to spend lots of money on store-made icings that are nasty and full of who knows what. This one's a winner!
BUTTERCREAM ICING
1/2 cup softened butter (1 stick)
1 package (16 oz. ) powdered sugar
4 to 6 tbs. milk
1 1/2 tsp. vanilla extract
In large bowl, with mixer at medium-low speed, beat butter, powdered sugar, 3 tablespoons milk, and vanilla until smooth and blended. Beat in additional milk as needed for easy spreading consistency. Increase speed to medium-high; beat icing until light and fluffy, about 1 minute. Makes about 2 1/3 cups.
If desired, tint with food coloring. Just be careful that if you use liquid food coloring, you will need less milk because that will make your icing soupy if you add too much coloring.
Tuesday, March 23, 2010
HONEY GLAZE SNACK

This recipe is rather plain in and of itself, but if you mix it up a bit, you've got a snack that's sure to get eaten fast. It's great to bring to a get together or to keep around the house for an afternoon snack. So yummy and so simple!
HONEY GLAZE SNACK
4 cups corn Chex (I like to do a mix of cereals such as Cheerios, Wheat Chex, and Crispix)
1 1/2 cups miniature pretzels (I've used pretzel sticks because it's cheaper)
1 cup pecans (I like to use a mix of dried nuts and dried fruits such as pecans and cranberries)
1/3 cup butter
optional - 1/4 tsp. cinnamon (I never really measure it, but just dump it in until it looks good, so I'm not positive 1/4 tsp. is the right amount.)
Combine cereal, pretzels, and pecans in bowl. Melt butter in pan, stir in honey and cinnamon and blend well. Pour over cereal mixture to coat it and mix well. Spread on a baking sheet. Bake at 350 degrees for 12 to 15 minutes, or until lightly glazed and lightly browned. Stir halfway through baking. When cool, store in container.
The more you mix up the recipe as far as the add-ins go, the better this tastes! It's kind of like a sweet and salty Chex mix, but way better and very addictive! I like to make a triple batch of this and bring it to church potlucks or when I visit with friends. It's a winner!
SKILLET GRANOLA- A healthy and quick breakfast

This granola is super-easy and quick to make and tastes absolutely delicious. It is a fraction of the cost of even the cheap granolas at the store and tastes better than the fancy stuff and you can put in what you like.
Skillet Granola
2 TBS. oil
4 cups rolled oats
½ cup butter, melted
1 tsp. vanilla
¼ cup honey
½ tsp. cinnamon
½ cup packed brown sugar
Optional:
¼ cup chopped almonds
¼ cup dried cranberries
¼ cup shredded coconut
¼ cup chopped pecans
Heat the oil in a large skillet over medium high heat.
Add oats and cook and stir often until starting to brown and crisp, approximately 5 minutes.
Meanwhile, mix together melted butter, vanilla, honey, cinnamon, and brown sugar in a bowl and add to oats once the 5 minutes is over.
Cook and stir well for another 5 minutes or so until well coated and slightly browned.
Mix in fruit and nuts if desired and stir well for another minute or so.
Pour out onto cookie sheet and spread out to cool.
If desired, you can bake granola on a cookie sheet in 350 degree oven for about 10 minutes to toast the nuts and get the granola a little more crispy.
This granola is super-yummy and slightly chewy unless you bake it. It’s great as a snack, served with milk, or on top of yogurt with fresh fruit. I’ve kept mine in a glass container for a week and a half and it was still fresh. Not sure how long it will keep, but it seems to keep a while. You can be very flexible with the fruit and nuts you put in. Put in whatever you like and however much!

I like to make 2 batches, but I don't put it all in one pan, but cook two batches back to back and cook it in a cast-iron skillet. It's super-quick to make.
Wednesday, July 29, 2009
Homemade Tortilla Chips

These are really easy to make and in no way compare to store-bought tortilla chips. They are so much better and so much cheaper and you can season them however you like. One of these days I'll learn how to make the corn tortillas from scratch but for now, store-bought will do.
Tortilla Chips
corn tortillas cut into 4 or 6 pieces (Kitchen shears make this easy and I cut at least 4 tortillas at a time to make this faster)
peanut oil preferably
salt and pepper
or cinnamon sugar
or other spices
(I prefer House Seasoning which I have a recipe for in this blog under "Seasonings")
Heat oil in a deep fryer to approximately 375 degrees. Add several tortilla pieces at a time but make sure there's enough room for them to get cooked. Cook until slightly browned (may take a few minutes), then turn over with tongs. Cook a few more minutes or until browned. I find that if they're not dark enough and are very lightly browned, the chips tend to be chewy instead of crunchy, but just be careful not to burn them. The browner ones taste better.
Dump the chips onto a cooling rack on top of a cookie sheet. I find this makes the least amount of mess and lets the excess oil drip through the cooling rack onto the cookie sheet and away from the chips. I like to let most of the oil drip back into the fryer anyways before I dump them onto the cooling rack so you don't waste as much oil. While the chips are still oily, sprinkle on seasonings. Enjoy with your favorite salsa or nothing at all. These make great nachos melted with cheddar cheese in the microwave, then topped with salsa and sour cream. Yumm!

Coconut Pecan Spice Cake

I found this recipe several years ago in a church cookbook and just finally got around to making it. The name didn't seem that appealing to me, but the ingredients did. So, I finally made it a week ago and it is probably one of my favorite cakes now because it tastes so good and is really easy to make. I changed the name from Oatmeal Cake to Coconut Pecan Spice Cake because I think that is a better way to describe this recipe. You don't exactly eat it and think "oatmeal" unless you're already familiar with the recipe. This cake is very moist and flavorful and would be great to take to a church potluck.
Coconut Pecan Spice Cake (Oatmeal Cake)
Cake:
1/2 cup butter
1 cup quick oatmeal
1 1/2 cups boiling water
1 cup brown sugar
1 cup white sugar
1 1/2 cups flour
1 tsp. baking soda
1 tsp. cinnamon
1/2 tsp. ginger
1/2 tsp. cloves
1/2 tsp. salt
2 eggs, beaten
Put butter and oatmeal in mixing bowl and pour boiling water over this and let stand for 20 minutes. While waiting, mix remaining ingredients (except eggs) in a large bowl. After 20 minutes is up, add dry ingredients to the oatmeal mixture and mix in the eggs.
Pour into a 13 X 9 inch greased pan and bake at 350 degrees for 30 to 35 minutes. While baking, prepare the topping.
Topping:
1/2 cup melted butter
1 cup brown sugar
1 beaten egg
1 cup coconut
1 cup chopped pecans
1 tbs. milk
Mix all ingredients in a bowl and when cake is done, pour and spread on top. Broil in oven until golden brown. Keep an eye on it because it browns quickly and you don't want to burn the pecans.
Enjoy!!

Green Tomato Bread

This recipe is surprisingly delicious and is a great way to use up some of those green tomatoes in your garden. It smells kind of like sugar cookies baking in the oven when you make it. Yummm!! This bread is very moist and sweet and sooo good! I've had it with breakfast, lunch, and with dinner with Country Crock spreaded on top. Did I say yummm??
Green Tomato Bread
3/4 cup butter, softened
2 cups sugar
3 eggs, beaten
2 tsp. vanilla extract
3 cups flour
1 tsp. salt
1 tsp. baking powder
1 tsp. baking soda
3 cups chopped green tomatoes
1 cup chopped walnuts (or other nuts)
Mix together wet ingredients in a large bowl. Mix together dry ingredients in a smaller bowl. Then add the dry ingredients to the wet and mix well. Add chopped tomatoes and nuts and mix well.
Divide evenly between two greased loaf pans and bake at 350 degrees for 1 hour.
Thursday, January 8, 2009
Ambrosia

This recipe is really easy to make and really yummy. It's great for potlucks, birthdays, or anytime.
Ambrosia
1 can (20 oz.) chunk pineapple
1 can (11 oz.) mandarin oranges
1 1/2 cups seedless grapes
1 cup miniature marshmallows (the colored, tropical flavored kind are really good)
1 cup flaked coconut
1/2 cup chopped nuts (I prefer pecans)
3/4 cup sour cream
1 tbs. sugar
1) Drain pineapple and mandarin oranges. Add grapes, marshmallows, coconut, and nuts.
2) Mix sour cream and sugar. Stir into fruit mixture. Chill for several hours.
Makes 4 to 6 servings.
Baked Vidalia Onion Dip

This is probably my husband's favorite dip and he's always requesting it! This recipe is super-easy too.
Baked Vidalia Onion Dip
1 cup chopped Vidalia onion
1 cup grated Parmesan cheese
1 cup Mayonnaise (Hellmann's is best)
1 clove garlic, finely chopped
1)Preheat oven to 375°.
2)In 1-quart casserole, combine all ingredients. Bake 25 minutes or until golden brown. Serve with your favorite dippers.
Oatmeal Nut Waffles
Move over Eggo! These waffles are easy to make and are way better than those frozen kinds in the store. These are hearty and would make a great breakfast with some eggs and OJ. I double these and keep them in a ziploc bag in the freezer for a quick breakfast. Just pop them in the toaster as usual.
Oatmeal Nut Waffles
1 1/2 cups flour
2 tsp. baking powder
1/2 tsp. salt
2 eggs, lightly beaten
2 cups milk
1/4 cup butter, melted
2 tbs. honey
1 cup quick oats
1 cup chopped nuts (I prefer pecans.)
1) Combine flour, baking powder, and salt. In separate bowl beat eggs, milk, butter and honey; mix with dry ingredients. Fold in oats and nuts.
2) Bake in a preheated waffle iron according to manufacturers directions.
Makes 8-10 waffles.
Oatmeal Nut Waffles
1 1/2 cups flour
2 tsp. baking powder
1/2 tsp. salt
2 eggs, lightly beaten
2 cups milk
1/4 cup butter, melted
2 tbs. honey
1 cup quick oats
1 cup chopped nuts (I prefer pecans.)
1) Combine flour, baking powder, and salt. In separate bowl beat eggs, milk, butter and honey; mix with dry ingredients. Fold in oats and nuts.
2) Bake in a preheated waffle iron according to manufacturers directions.
Makes 8-10 waffles.
Subscribe to:
Posts (Atom)